
Property Overview
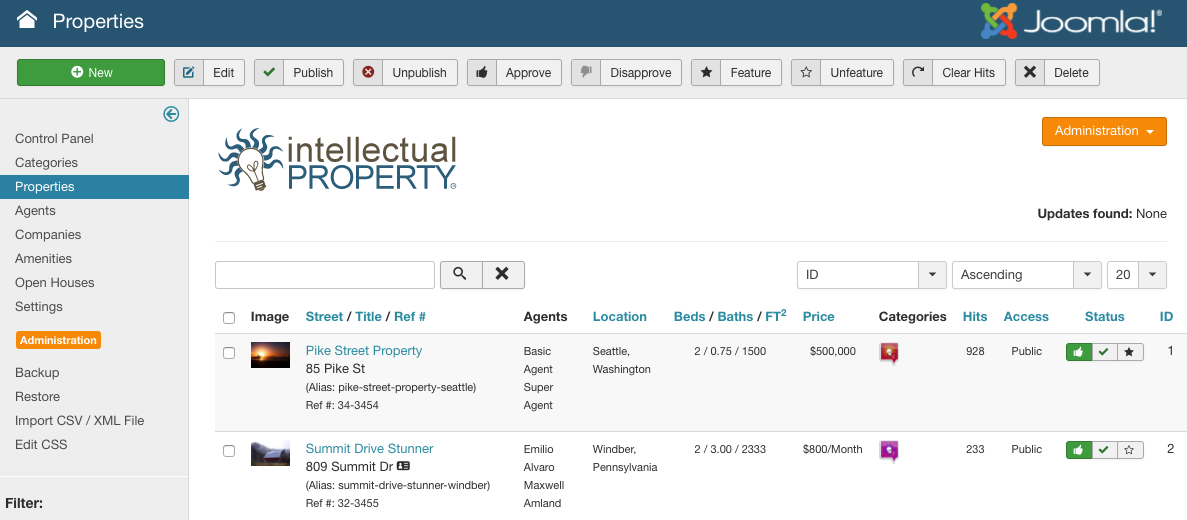
Properties represent the listings you want to display on your website. These are the most important items on the site, since this is what the site is all about! The main Properties panel is depicted in Figure A. Listings can be filtered on this page by Category, Company, Sale Type, City, Minimum Beds, Minimum Baths, by Keyword search, or Published, Unpublished, and Active status.
From the main Properties panel, you will see a thumbnail image of each listing, its reference number, Street address, Agent or Agents representing the listing, Location (City and State/Province), Beds, Baths, Sq Footage, Price, Category (or Categories) that the property belongs to, Access level, Featured status, number of Hits, and Published status.
Listings can only be assigned to one company, but can be assigned to multiple categories and agents. You can upload icons or logos for each category and company to help brand your offerings.
Add a Property
To add a property, click the New button in the upper right of the Properties panel (Figure A). You will open the Add Property dialogue (Figure B). There are several tabs in this Add Property dialog: Description, Location, Details, Amenities, Images/Video and Notes. Additional tabs can also be added via plugins. We’ll address the default tabs in order.
Description
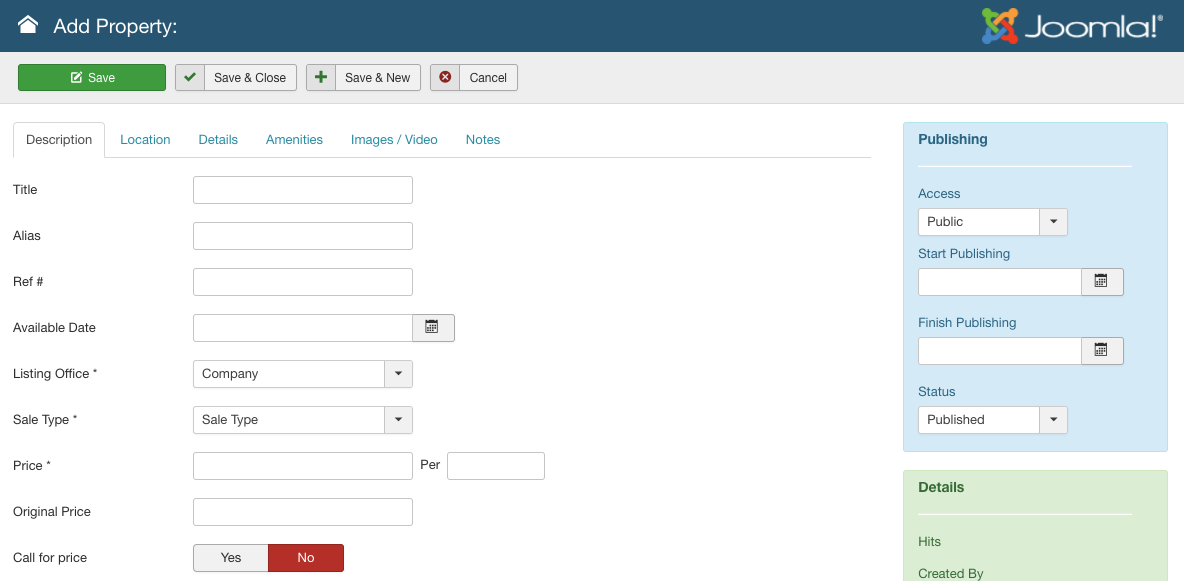
The Description tab (Figure B) of the Add Property dialog allows you to set the basic information on the property. The items are listed in the order they appear, with a description of the purpose of the item.
-
Property Title (optional): Property Title will only appear if the “Use Title Field” option is selected in the Intellectual Property/Settings/General Settings tab. This will replace the property address in all property displays, if you choose not to list the actual address of the property on the front end.
-
Alias: The alias field is not required. However, if it is not supplied an alias will be auto-generated for you. Aliases are used by the core Joomla SEF functions to provide URLs to the object. Spaces and special characters are not allowed in alias fields.
-
Ref#: The reference # can be an internal or MLS-designated reference number. Many companies use a code similar to “09-1234”, which would be 09 for the year, and listing 1234.
-
Available Date: The date that the property will become available on, usually relevant for long term rental or under-construction houses.
-
Listing Office: This is the company that the listing belongs to. These must be defined first, by adding companies to the company panel.
-
Sale Type: This can be for sale, for lease, for sale or lease, for rent, pending, or sold. Please see the Settings/Misc tab section of this manual for information on adding your own sale types.
-
Price: There are two text boxes here, one for the price and one for the time period (if needed). For a straight sale, leave the second box empty. Example: A home for rent for $900 per month would have “900” as the first entry, and “month” for the second. DO NOT ENTER A CURRENCY SYMBOL.
-
Original Price: If the price of the property has been reduced, you can use this for the “Original price”, with the Price field being the current price. This will cause IP to show a “Reduced” banner in the property listing view, as well as the original price crossed out and the “new” price featured. Leave this field blank if you do not want to use this feature.
-
Call for Price: If you tick this option, the price will not be displayed to users on the front-end. Instead, a “Call for Price” notice will be given with the property listing.
-
Virtual Tour: You may add a URL here for an external virtual tour service. This will not “embed” the tour– rather it till open a new tab/window with the tour in the new window.
-
Categories/Agents: These multi-select boxes allow you to select multiple agents and categories for the property. Hold down shift and click to select multiple values.
-
Preview Text: This can be a short description to show up on the preview screens and search results. If you leave this empty it will not be used.
-
Description: The main description for the property.
Location
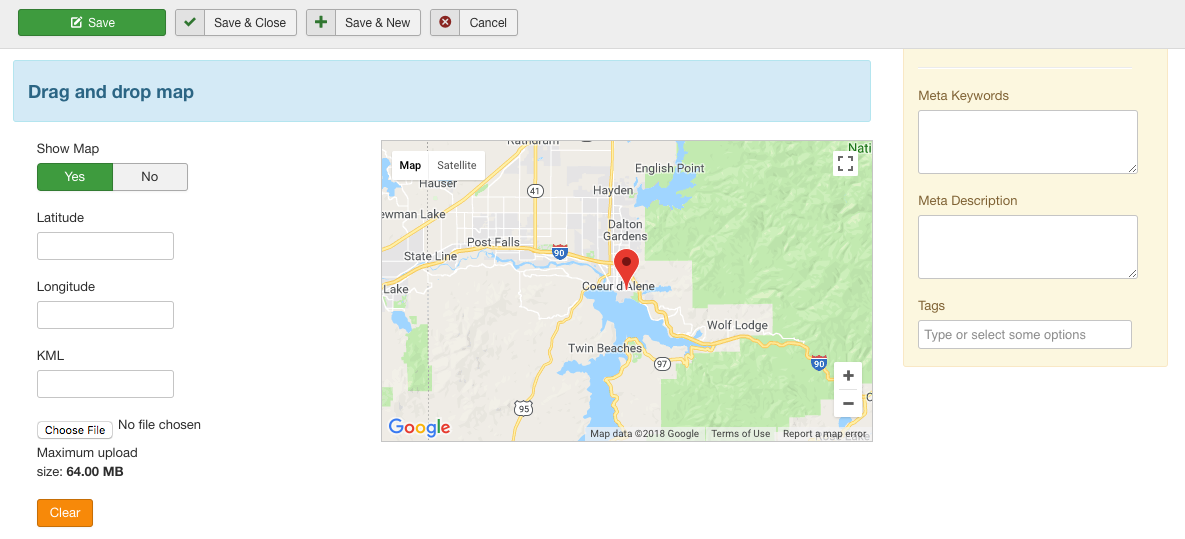
The Location tab (Figure C) of the Add Property dialog allows you to set location information about the property. The items are listed in the order they appear, with a description of the purpose of the item.
-
Hide Address: if this option is selected, the address will not be shown on the front end property view, and the location of the property in the Google Map will be rounded off so that an exact location cannot be determined. This is useful in the case of vacant houses or owners who wish privacy.
-
Street number: the number of the property or house (Eg. 1234 Main Street Apt. 2E Mytown, MyState, USA 99292 would take 1234 as this value).
-
Street: the street name (Eg. 1234 Main Street Apt. 2E Mytown, MyState, USA 99292 would take Main Street as this value).
-
Street 2: the second part of the address, if required.
-
Suite/Apartment: the suite or apartment number (Eg. 1234 Main Street Apt. 2E Mytown, MyState, USA 99292 would take Apt. 2E as this value).
-
City: the city name (Eg. 1234 Main Street Apt. 2E Mytown, MyState, USA 99292 would take Mytown as this value).
-
Postal Code: the zip or postcode of the property (Eg. 1234 Main Street Apt. 2E Mytown, MyState, USA 99292 would take 99292 as this value).
-
State or Province: the state or province name (Eg. 1234 Main Street Apt. 2E Mytown, MyState, USA 99292 would take MyState as this value).
-
Country: the country name (Eg. 1234 Main Street Apt. 2E Mytown, MyState, USA 99292 would take USA as this value).
-
Region: a region, neighborhood or district name, if desired.
-
Subdivision: the subdivision name.
-
County: the county name.
-
Show Map: choose whether to show or hide the Google Map in the property display view. Defaults to Yes.
-
Latitude: the latitude of the listing. If you don’t know the latitude, you can drag the marker on the Google Map on this page to get a valid geocode. (Note: Zoom in to get an accurate reading).
-
Longitude: the longitude of the listing. If you don’t know the latitude, you can drag the marker on the Google Map on this page to get a valid geocode. (Note: Zoom in to get an accurate reading).
Details
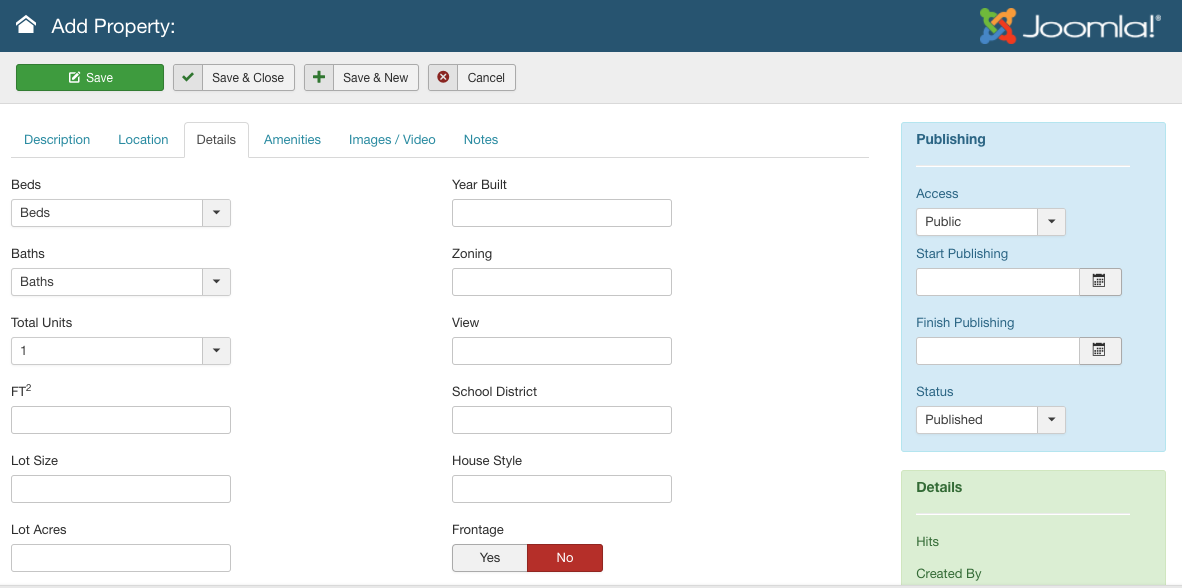
The Details tab (Figure D) of the Add Property dialog allows you to provide details about the property. The items are listed in the order they appear, with a description of the purpose of the item.
- Beds: Select # of beds. Set at the maximum/minimum values from Intellectual Property Settings panel
- Baths: Select # of baths. Set at the maximum/minimum values from Intellectual Property Settings panel. Note: you can turn off fractional baths in the Settings/Global Iproperty Settings panel.
- Square Ft: Total Sq Ft. of the property Note: you can set this to square meters by changing the measurement unit selector in the Settings/Global Iproperty Settings panel.
- Lot Size: Size of lot (Enter integer or string)
- Lot Acres: Acreage of plot (Enter integer or string)
- Lot Type: Type of lot (eg. interior, corner, flag)
- Heat: Type of heat source (eg. forced air, gas, coal)
- Cooling: Type of cooling (eg. heat pump, central AC)
- Fuel: Type of fuel (eg. natural gas, propane)
- Garage Type: (eg. covered carport)
- Garage Size: (eg. 2)
- Siding: Type of siding (eg. vinyl)
- Roof: Type of roof (eg. singles, sheet metal)
- Reception: UK-centric field for reception
- Tax: Estimated yearly tax
- Expected Income: Primarily for commercial properties or rentals
- Year Built: Year structure was built
- Zoning: Any zoning information (eg. commercial etc.)
- View: Notes on the view (eg. lake view)
- School District: School district serving the property
- House Style: Architectural style (eg. rancher, split level, etc.)
- Frontage: Waterfront yes or no
- REO: Real Estate Owned yes or no(eg. foreclosure/bank owned)
- HOA: Home Owners Association yes or no
Amenities
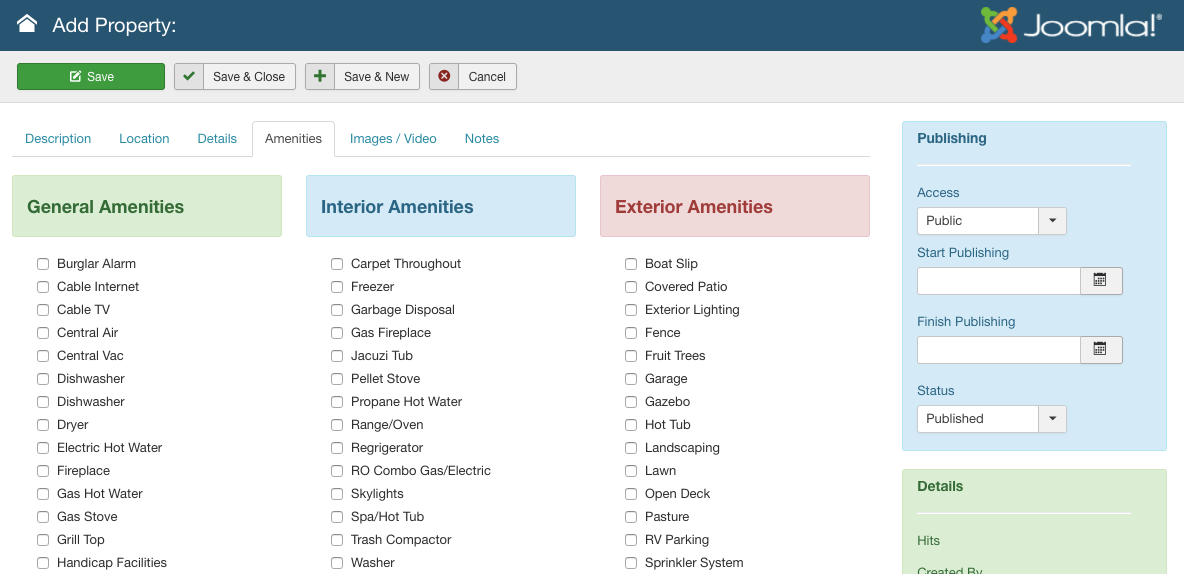
The Amenities tab (Figure E) of the Add Property dialog allows you to provide details about the property’s amenities. Simply check or uncheck the boxes that apply. To add, edit or delete amenities, see the section of this manual dealing with Amenities.
Images/Video
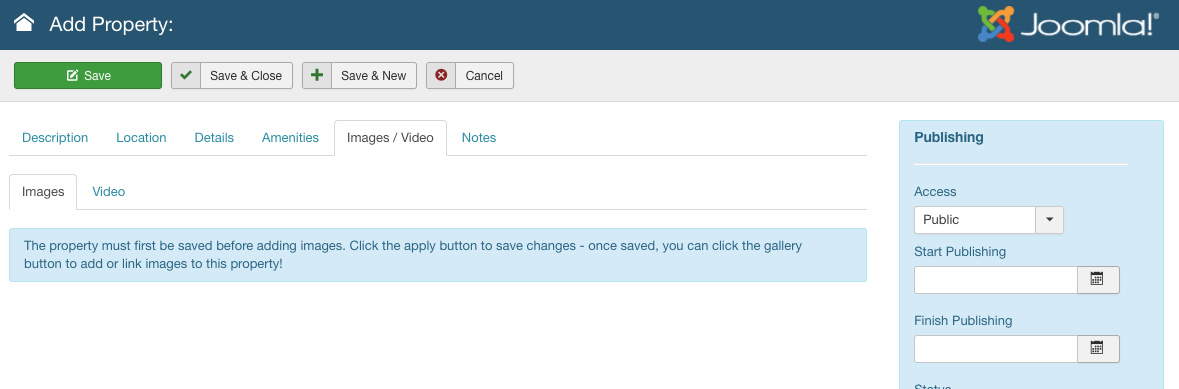
Images
The Images tab (Figure F) of the Add Property dialog allows you to upload and manage images for properties. Notice that in Figure F, there are no options since the property has not yet been saved. After the property has been saved, new options will be available in the Images tab (seen in Figure G).
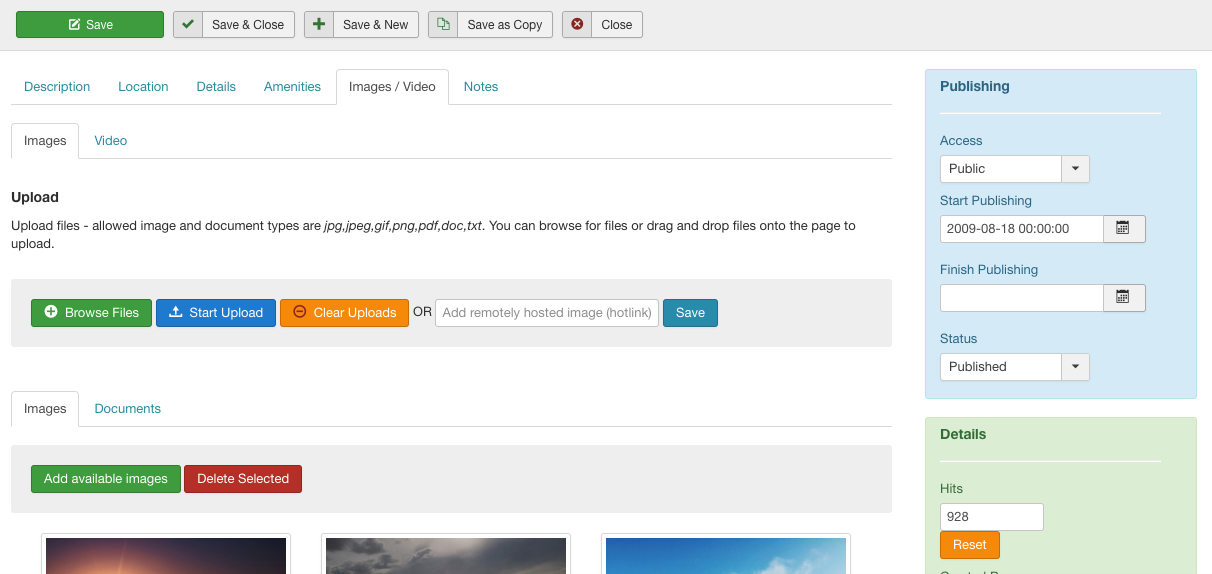
Uploading Images
To upload images, click the Browse Files button. You will be able to select multiple files using shift-click or control-click in the select dialog, or you can select individual files, which will appear in the “Files” dialog. When you’re ready to upload the images, click the “Start Upload” button, and the images will be uploaded, resized, watermarked and saved. You can set the options for image size, quality and watermark in the IProperty Settings / Gallery tab.
Hotlinking Images
The Hotlink Remote Image field allows you to hotlink an image that exists on another host. You must supply the full path to the image, eg. ‘http://example.com/images/image0001.jpg’. Please note that a hotlinked image will NOT be copied to your local IProperty installation. Therefore no resizing will occur, and no watermarking will be added. The images will obviously NOT be deleted from the remote server when you delete them from a local property.
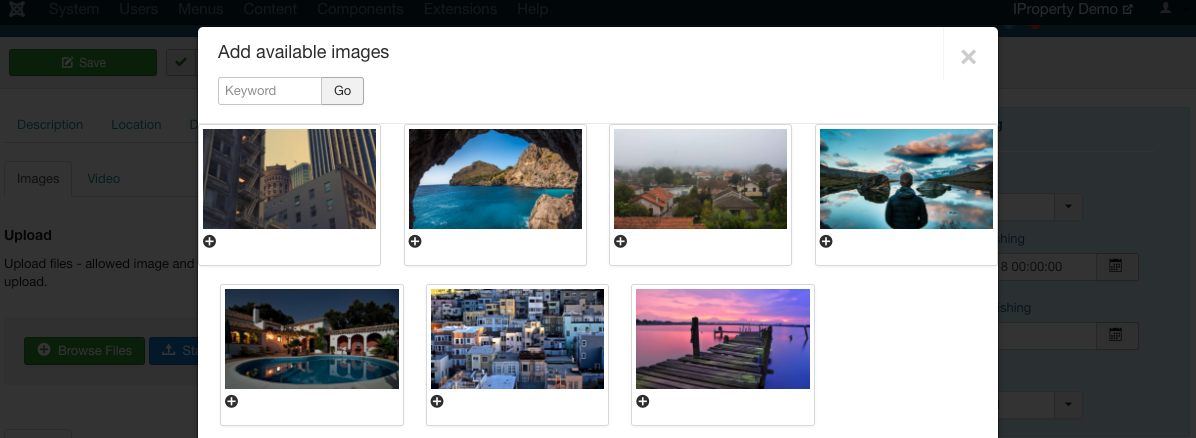
Adding Available Images
The property in Figure G has several images already attached to it. If you click on the “Add Available Images” button, a modal window will open with all available images from other listings that the user has access to. You can click to select available images, which will open in a new window (Fig H).
Video
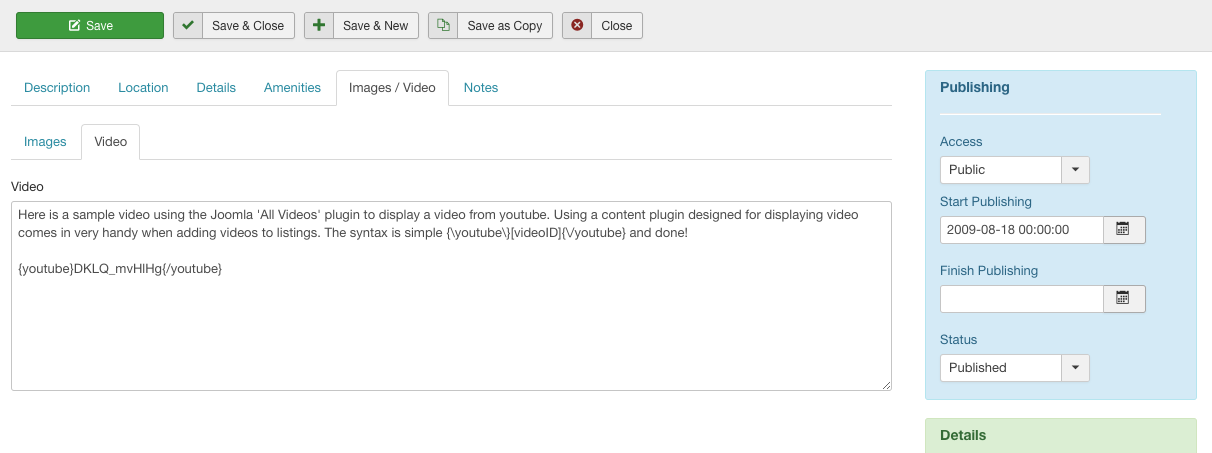
The video tab (Figure I) allows you to add video into the IP Listing view page via embed code OR using content plugin code. The input for the video field depends on your user level. Super administrators should be able to add any embed code, iframes, etc with no filtering; however, these filters depend on your global configuration text filter settings (Admin->Site->Global Configuration->Text Filters).
Video using Content Plugins (recommended method): There are many content plugins available for embedding video. Some of these can be found on the JED here. The ‘allvideos’ plugin by JoomlaWorks and ‘rokbox’ plugin by RocketTheme are known and trusted plugins which we typically use. Check the documentation for these products to learn the proper syntax for embedding video.
Embedding video: Just paste in the “embed” code from youtube.com, vimeo, or other video service. Please check their documentation for more information on obtaining the embed code. Any potentially dangerous tags will be stripped from the video field according to the user’s text filter level. For example, a registered user may not be able to add embed code unless an administrator has approved the embed tags in the global configuration text filter settings.
Agent Notes
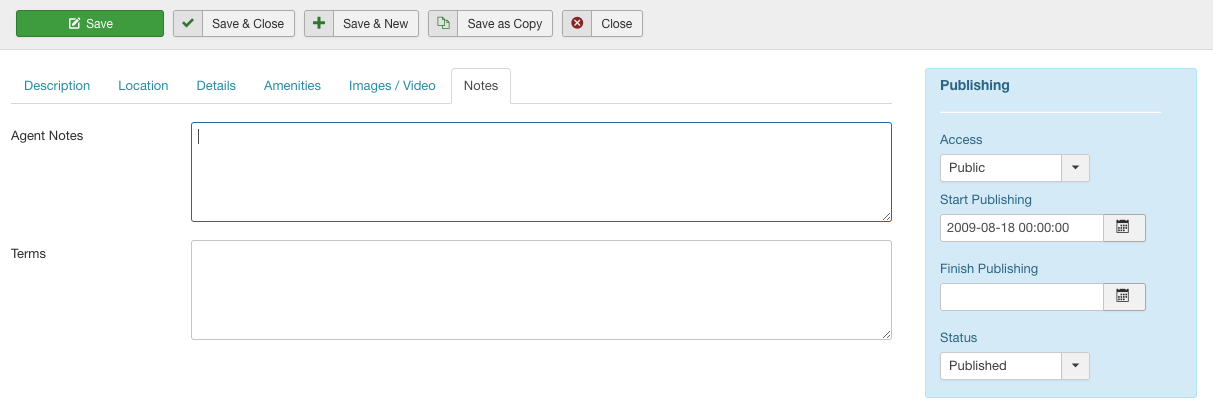
The Agent Notes tab (Figure J) is simply an area that agents and administrators can use to leave notes on the listing. These notes will not be displayed to users on the front end, so they can be used to comment on the seller’s availability for showings, general status of the property, etc.
Terms are often used if the seller has certain conditions that he is willing to offer (eg. “Owner will carry paper with 30% deposit”).
Publishing, and Meta Information
To the right of the Property tabs is an area that allows admins and super agents the ability to modify certain core aspects of the Property object (As seen in Figure J). In order, the items are:
-
Access: If you wish to make a property unavailable to Guests, or make a property only viewable by another user group (eg. Admins, Publishers, etc.) you can set the Access level here
-
Start Publishing/End Publishing: You can set future dates for a Property to go “live” and to be automatically unpublished if you like by setting these values. If the date appears to be wrong, check your Joomla / Global / Server / Server Time Zone settings!
-
Status: Published / Unpublished
-
Hits: Number of times the Property has been viewed. This is not “distinct” hits, but total hits.
-
Created By: User who created the Property. Admins can change this, in the case where perhaps an admin or super agent creates a property but wants to make it the property of another user.
-
Created Date: Defaults to “now”. Can be post- or pre-dated to affect the “Days New” or “Updated Days” settings.
-
Featured: Show the Property with the Featured Properties, where applicable.
-
Approved: If “Auto Approve” is set to No in the Global IProperty settings, when agents create properties they will be published but set to Unapproved– an Admin will have to Approve each Property.
-
Meta Keywords/Description: If you choose to add custom meta tags on a per-property basis, these values will replace the global site meta tags created in the Joomla Global / Site / Metadata section.